While you have time on your hands, you might want to make your own feeder. This is a relatively easy and low-cost project. We made it in about an hour, but that included rounding up supplies.
Supplies we used include: A five gallon bucket, a power or hand saw, a drill with a quarter-inch bit, ten quarter-inch bolts (about an inch long) with nuts and washers, plumber's strap, clamps or vise grips, ratchet straps, or feel free to improvise with what you have on hand.
Step 1. Find your bucket. We recommend using a five-gallon bucket. We used a smaller bucket for these pictures, but have found that a five-gallon bucket works much easier. You can use one with or without a handle. If it doesn't have a handle, just drill a hole in each side and use a piece a wire.
Step 2. Cut the bucket. We used a table saw, but if you can clamp it to something you can use a hand saw or saber saw. Cut around the bucket about two inches up from the bottom. After the bottom is off, cut along the side. If you want to use the handle that's there, cut fairly close to the handle. That will make it easier to attach together.
Step 3. Squeeze the bucket together until it's about an inch and a half smaller than the circumference of the bottom. The sides that you cut will overlap. A ratchet strap seems to work really well to hold the bucket in place. Once it's in position, clamp it.
 |
| Ratchet strap |
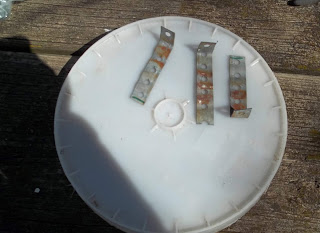
Step 5. Take the plumber's strap and cut three chunks out, each with eight holes. Bend in a L shape so there's one hole on one side and seven on the other. This will allow you to adjust the size of the hole for the feed based on the birds you are feeding.
Step 6. Drill three equally-spaced holes in the body of the bucket. Drill the holes about an inch from the bottom. Put a bolt and washer through the outside of the bucket. Put the plumber's strap onto the bolt with the "L" shape facing in. You'll want the L shape about an inch to an inch and a half below the bottom edge of the body of the bucket. Finger-tighten the nuts in case you need to re-position later.
Step 7. Position the bucket over the bottom so that it's equal all the way around. Mark each hole from the bottom of each piece of the plumber's strap with a marker so you know where to drill the holes.
Step 8. Drill the holes in the bottom of the bucket. Bolt the top to the bottom through the plumber's strap into the bottom. Tighten the bolts.
--Dale AKA Turkeyman


No comments:
Post a Comment